

How To Download Pictures From Iphone To Computer
How to Download Pictures from iPhone to Microsoft Surface Pro
If you have taken many pictures on your iPhone and want to transfer them from iPhone to Microsoft Surface Pro as a backup, this guide will show you how to make it with three easy methods.
iPhone Transfer Tips
With the built-in iSight camera of iPhone, we can take high-quality pictures with our devices, like HEIC format from iOS 11. Therefore, no matter where you are, you can just use your iPhone to record the amazing moment in your daily life without a professional camera like Canon or Nikon. There is no doubt that you may have many valued pictures on iPhone. So you can download pictures from iPhone to your Microsoft Surface Pro as backups in case of accidental data loss, and then delete some pictures on the device to free up space.
When it comes to transferring pictures from iPhone to Surface, you are likely to use Windows Explorer or Windows AutoPlay to make it. The tools mentioned above are applied to transfer pictures in Camera Roll from iPhone to Surface. For Photos in folders like Photo Stream or Photo Library, they can't help you. In this guide, we will show you how to quickly transfer photos from iPhone to Surface Pro with three methods.
You May Like: How to Transfer Photos and Videos from iPhone to Mac >
Method 1: Easily Download Pictures from iPhone to Surface Pro with AnyTrans
AnyTrans is one of the best iOS content transfer software to transfer pictures from iPhone to Surface Pro. It allows users to transfer photos in My Photos, Albums, Photo Stream and Peoples, Places, Photo Videos. And it also supports syncing photos from laptop to your iPhone. Besides pictures, it supports managing files like videos, music, contacts, messages, notes and more on iOS devices. In addition, it is compatible with all iOS models of iPhone, iPod, iPad and computers. Here are the steps you can follow to sync iPhone photos to your Surface Pro with ease:
Step 1. Free download and install AnyTrans on Surface, and connect your iPhone to Surface via a USB cable. Click the Device Manager and choose Photos from the homepage.
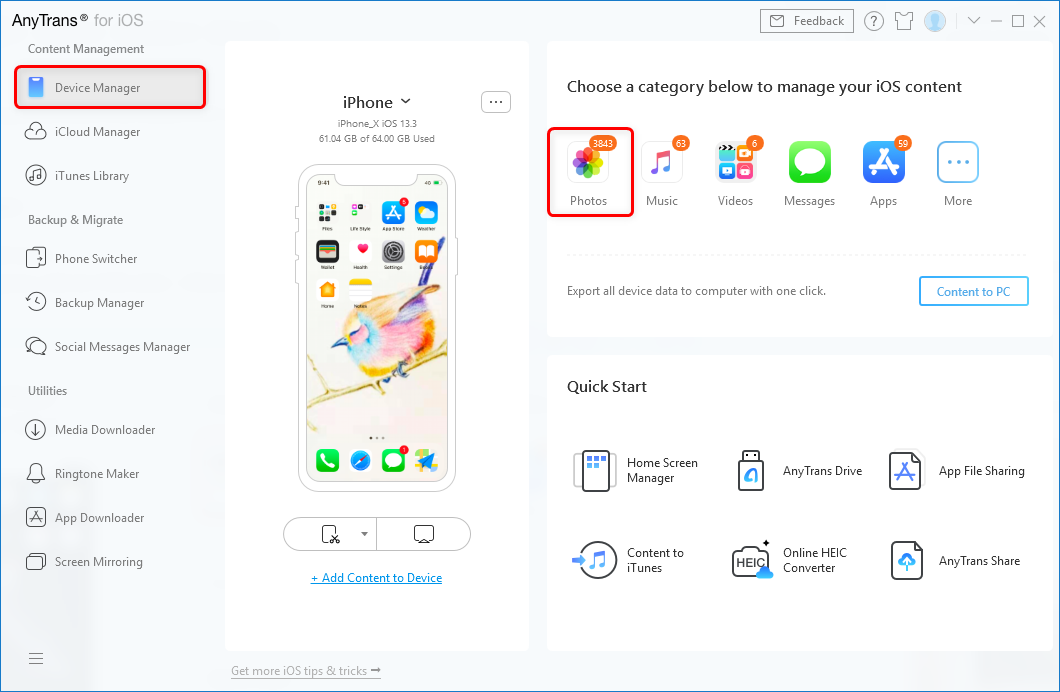
Use Device Manager to Transfer Photos
Step 2. Click on Photos, and then select the album with photos you want to transfer to Surface, like My Photos (including Places, People, and more), Albums, Photo Stream, etc.

Download Pictures from iPhone to Surface Pro – Step 2
Step 3. Preview and select the photos you want to transfer > Click Send to PC button to get selected iPhone photos to your Surface Pro.

Download Pictures from iPhone to Surface Pro – Step 3
Method 2. Download iPhone Photos to Surface Pro via iCloud
If iCloud is enabled on your iOS device, you can download your photos to Surface via iCloud website. Go to icloud.com > Enter your Apple ID and password > Click iCloud Photos and select photos you want to download > Tap the button "Download Selected Photos". Then you can easily view your iPhone photos on computer.

Download iPhone Photos to Surface via iCloud
Also, you can set up iCloud for Windows on your Surface: Download and install iCloud for Windows for your Surface > Restart Microsoft and open iCloud for Windows from Start > Then enter Apple ID and password > Then select the Photos to sync to your Surface and select apply.
Method 3. Sync Photos from iPhone with Surface Pro Microsoft OneDrive
Using OneDrive to sync photos from iPhone to Surface. On your Surface, you need to sign in to your Microsoft account first: Select Start > Settings > Accounts > Email & app accounts > Add an account > Sign in with your Microsoft account and follow the prompts.
On your iPhone: Download OneDrive app from App Store > Open the OneDrive app and sign in with the same Microsoft account, then follow the instructions > Select Start Camera Upload to enable automatic photo uploading to OneDrive. Also, you can also tap Me, Settings, and the Camera Upload option to turn on automatic photo uploading.
Bonus Tip: How to Download Pictures from iPhone to Surface Wirelessly
Apart from transferring pictures from iPhone to Surface Pro with AnyTrans, there's another app could help you to transfer photos wirelessly. With AnyTrans app, you could download photos from iPhone to your Surface pro without a USB cable.
Step 1. Download AnyTrans app on your iPhone.
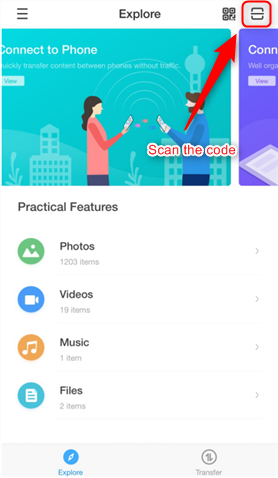
Step 2. On your Surface: Go to AnyTrans website and you will see a QR Code.

Download Pictures from iPhone to Surface Wirelessly – Step 2
Step 3. On your iPhone: Open AnyTrans app, and tap on the Scan button to scan the QR code on your Surface.
Download Pictures from iPhone to Surface Wirelessly – Step 3
Step 4. Then all your iPhone photos will show up on your Surface Pro computer. Select the photos you want to transfer and click on the "Download" button to download pictures from iPhone to Surface Pro.

Download Pictures from iPhone to Surface Wirelessly – Step 4
The Bottom Line
Besides transferring pictures from iPhone to Surface and Surface Pro, we can also use AnyTrans to transfer files from iPhone to Mac, to iTunes and another device without erasing the previous data. Download it now to have a try. If you still have any question, please contact our support team by Email. If you like this guide, please share it with your friends.

Member of iMobie team as well as an Apple fan, love to help more users solve various types of iOS & Android related issues.
How To Download Pictures From Iphone To Computer
Source: https://www.imobie.com/support/download-pictures-from-iphone-to-surface.htm
Posted by: hardinaporged.blogspot.com
0 Response to "How To Download Pictures From Iphone To Computer"
Post a Comment